Leaving Luggage: Exploring the Unknown
Activity Objective:
In third grade, students learn about what it means to be an immigrant.
This project's goal is to have students imagining immigrating to another country, contemplating what personal belongings they would take with them.
Materials:
Two 12x18-inch sheets of paper
A 9x12 inch piece of paper
Markers and crayons
Scissors
Stapler
Glue stick
Pencil
Eraser
Optional Materials:
Decorating materials (such as stickers and glitter)
Instructions:
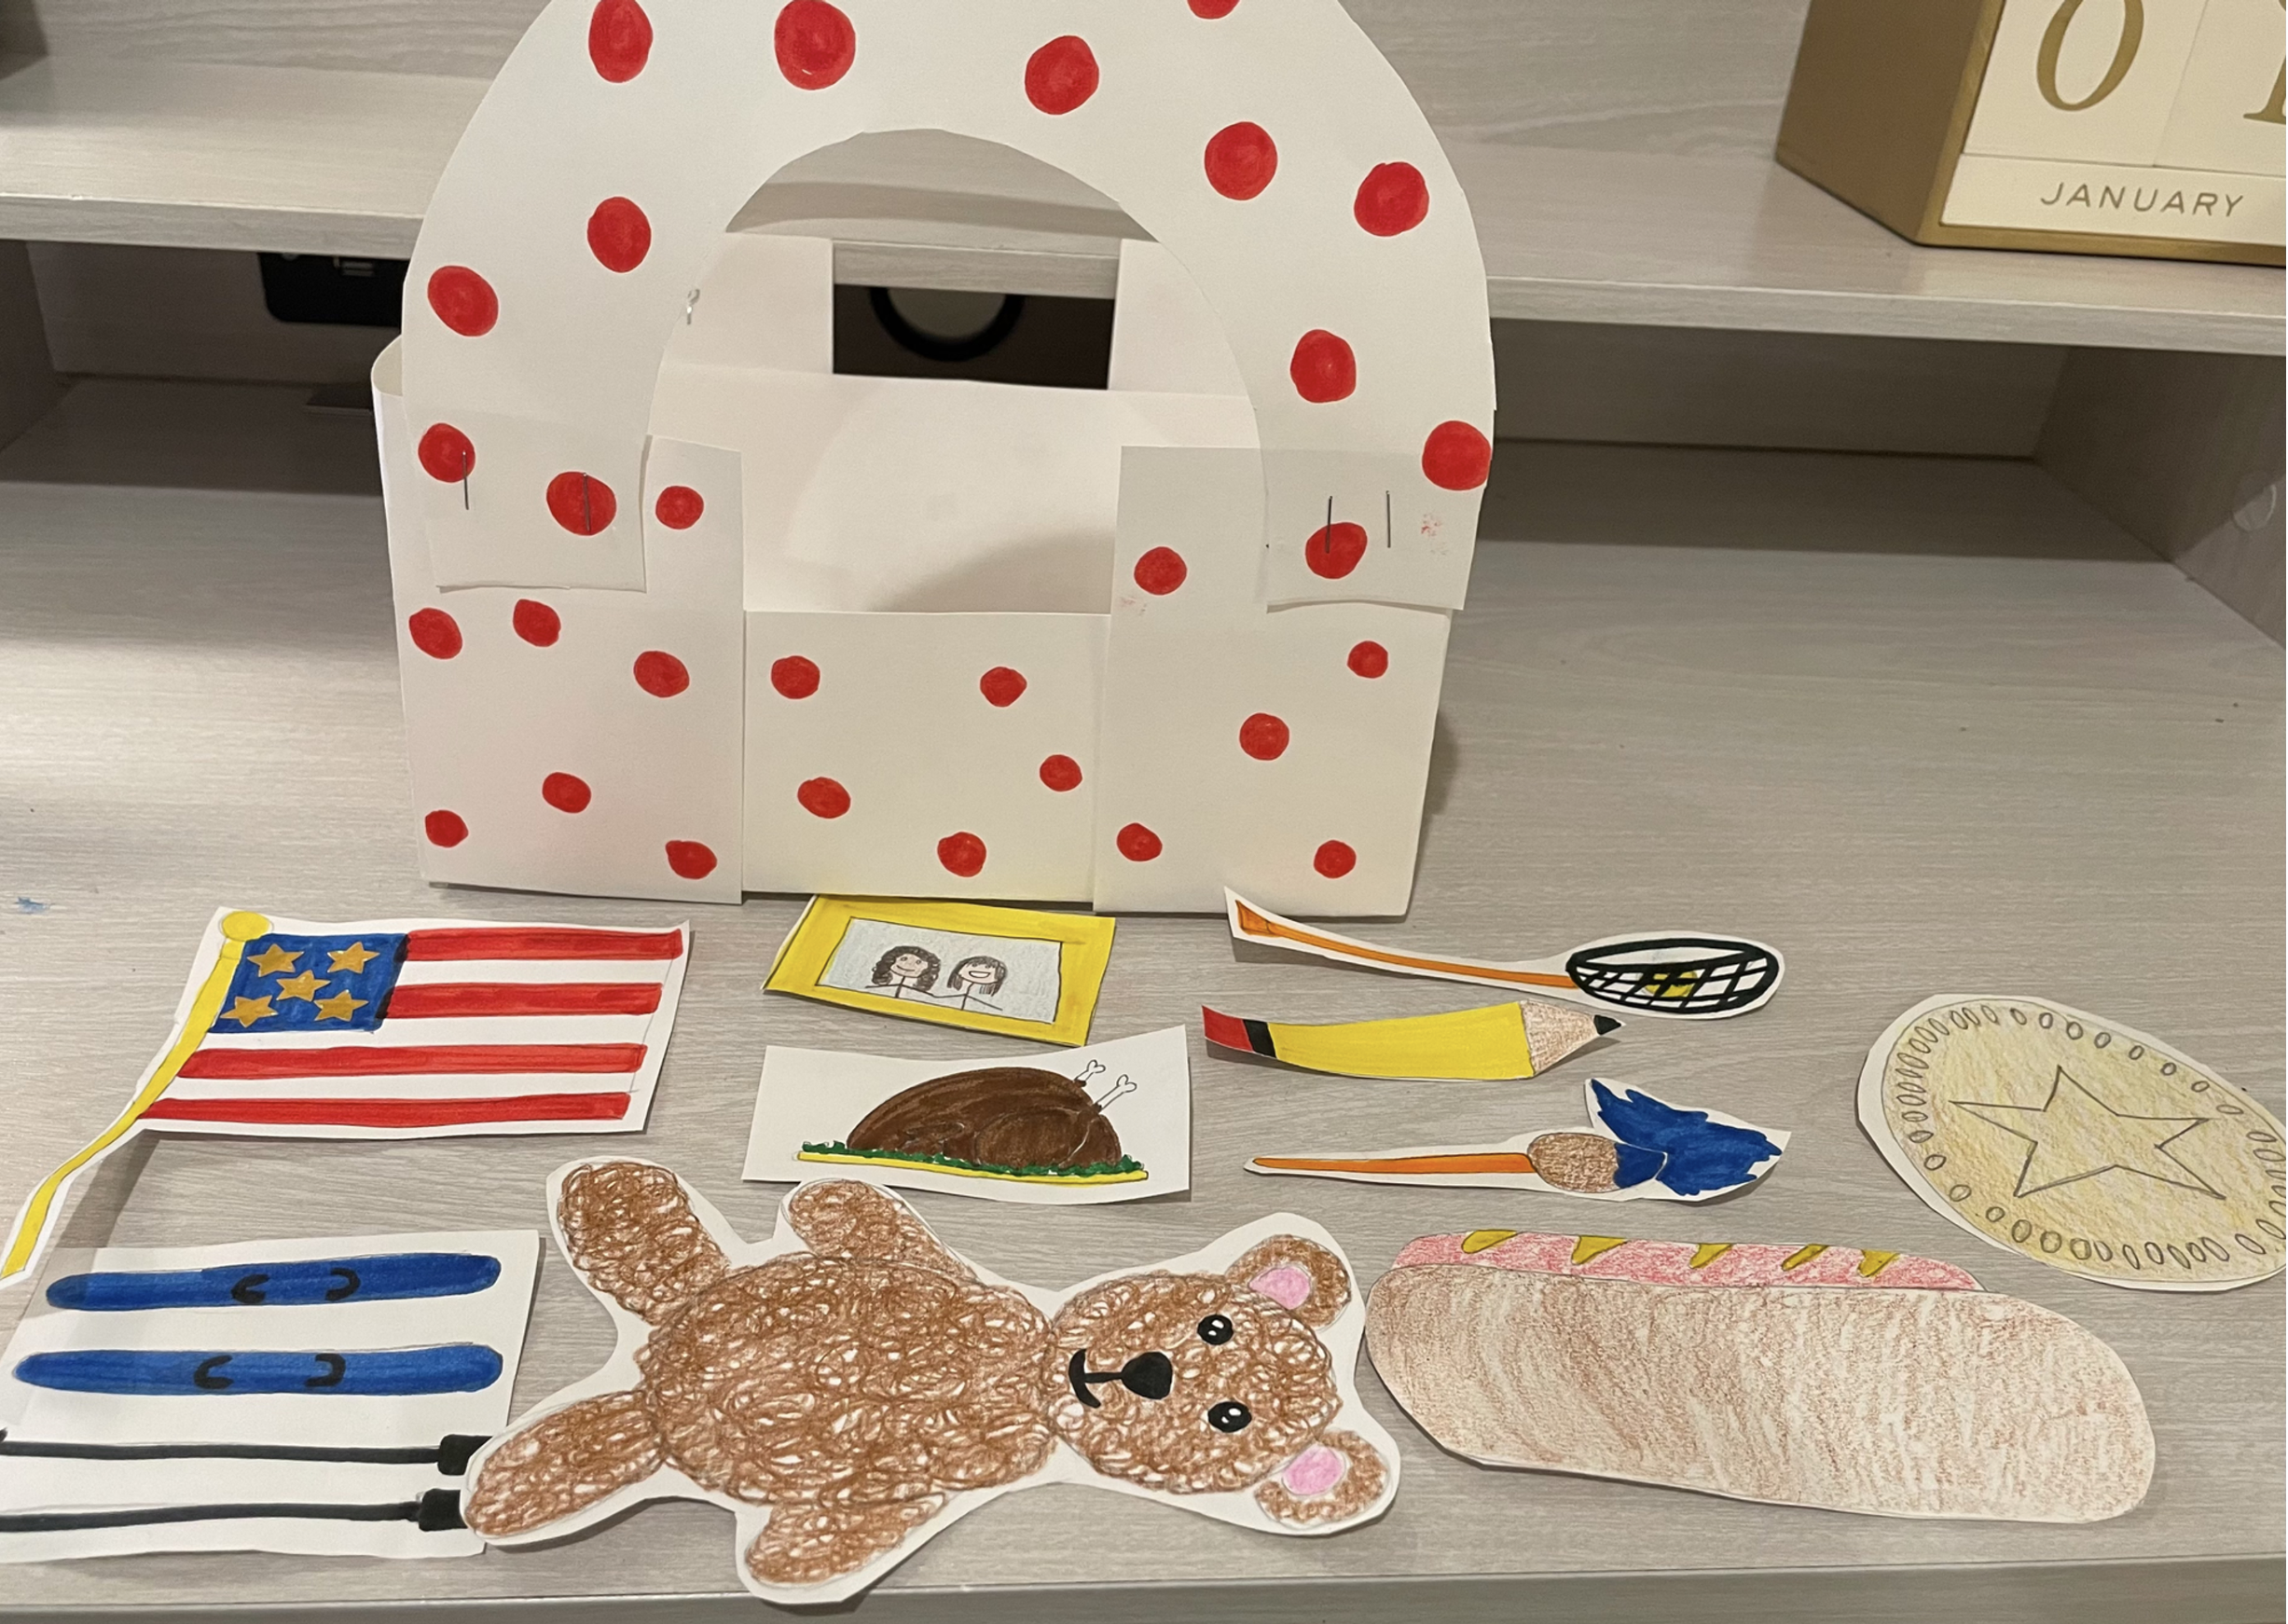
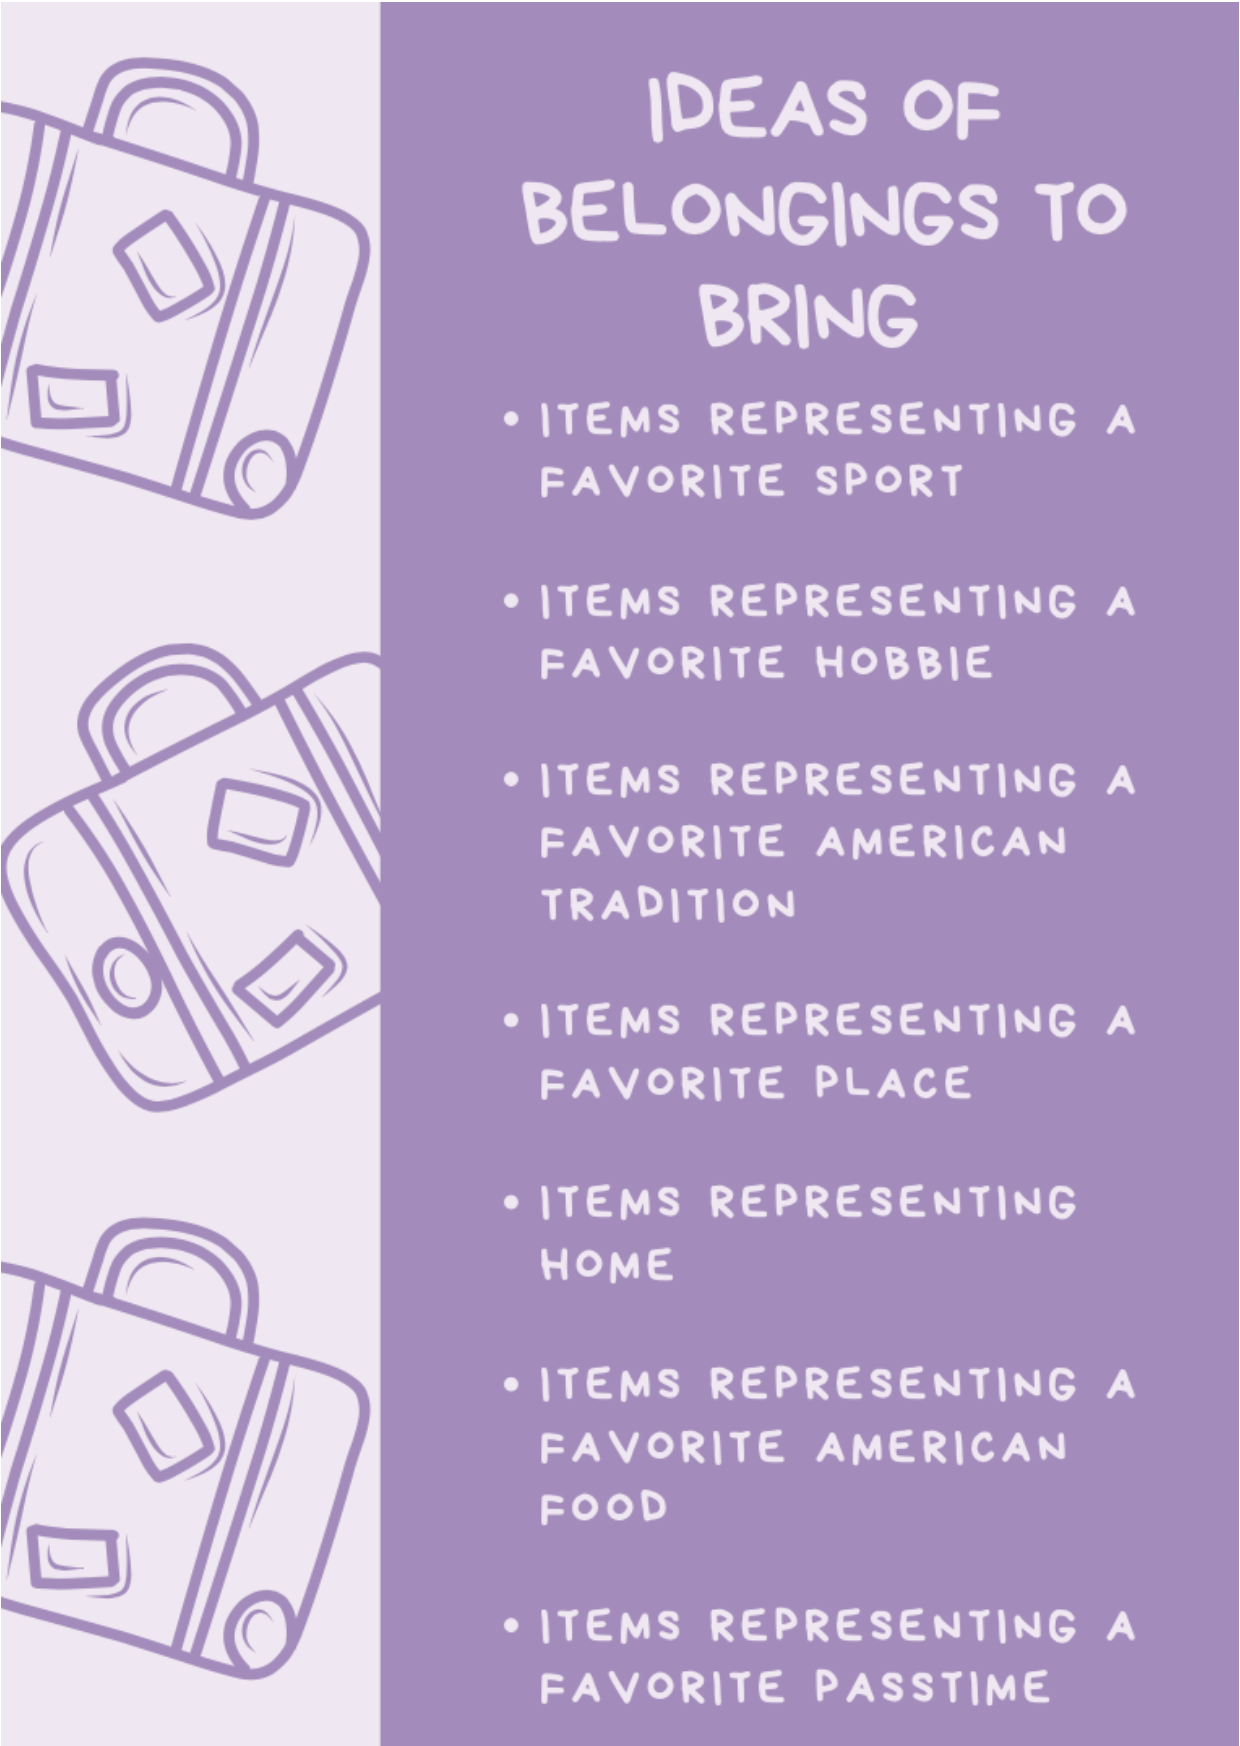
Before starting the project, students should review the vocabulary words below. Students should imagine that they are emigrating from America and immigrating to a new country. Since they are leaving America, they have to pack a luggage with personal belongings that they will bring to this new country. These personal belongings should be representative of the student's life. For example, items can represent the student's favorite hobbies, things that remind the student of home, and the student's favorite American traditions.
Students can verbally brainstorm idea of 5-12 belongings that they will "pack."
Students should lay one of the 12x18-inch sheets of paper horizontally and fold it in half, lightly pressing down on the crease to make a light, vertical crease line in the middle of the paper. (see video example)
Then, students should fold the left side of the paper towards the crease line made in step 3, firmly creasing the fold. This should be repeated with the right side of the paper. Students should have created a trifold. (see video example)
Keeping the trifold closed, with the two flaps laying down flat, students should fold the bottom part of the trifold to the top of the trifold, folding the trifold in half. Students should press down lightly on the crease. This will create a light, horizontal crease line in the middle of the trifold. (see video example)
Then, students should fold the bottom half of the trifold to the crease line made in step 5, firmly creasing the fold. This should be repeated with the top half of the trifold. (see video example)
Once completed, students should open up the paper, so it lays unfolded horizontally. The paper should have 3 horizontal crease lines and three vertical, column-like crease lines. (see video example)
On the leftmost and rightmost columns of the paper there will be four boxes created by the folds. Students should cut the single vertical line outlining the bottom and top boxes of the leftmost and rightmost columns. (see video example)
The cuts created in step 8 will create 6 flaps, each of the flaps should be firmly folded inwards to the middle of the paper. A hot dog shape should be created. (see video example)
The folds from step 9 should then be opened up so the flap are standing up. Then the leftmost and right most columns of the paper should be folded inwards to the two middle flaps. A box shape should be created. (see video example)
Using a glue stick or stapler the sides of the box should be adhered to each other. This box will be the body of their luggage. Students can decorate the body of their luggage.
Next, students should take the 9x12 inch paper and hold it vertically.
Then, students should fold the paper in half, like a hamburger, bringing the bottom half of the paper to the top, firmly creasing the paper.
Using a pencil, students should draw a large outline of a rainbow on the folded paper, with the bottom of the rainbow touching the crease line. The rainbow should be large enough for the sides and top of the rainbow to be touching the sides and top edges of the folded paper. (see video example)
Next, students should cut out the outline of the rainbow, making sure that they cut the crease line. This will result in two rainbow shapes. These will be the handles of the luggage. (see video example)
Students can decorate their handles and the body of their luggage with crayons or markers. Using a stapler or glue stick the two handles should be attached to the two longer sides of the luggage's body. (see video example)
On the inside of their luggage's body students can write their name and the country that they are emigrating from (America).
On the second sheet of 12x18-inch paper, students can draw the 5-12 belongings that they thought of in step two.
Then, students can cut out these drawings to "pack" in their luggage.
Sample Discussion:
Students can "pack" their luggage. As they pack each item, they can explain why they chose to bring each item to their new country and how this item will be impactful to them as they live in a new country, far from home.
Example discussion:
I am packing a sand dollar because I love going to the beach. When I am in my new country, looking at this sand dollar will bring me happy memories of fun beach trips that my family and I use to take on weekends during the summer. I am packing a hot dog because it is my favorite American food. I am not sure if my new country will have hot dogs, so this hot dog that I am bringing will give me a taste of home. I am packing a photo of me and my friend because I am going to miss her when I leave America. When I move to my new country looking at this photo will remind me of all of my friends back home.
Vocabulary Words:
Emigration: Leaving your current country to live in another. (Remember- Emigration means to Exit to a country) Students are imagining that they are emigrating from America.
Immigration: Moving to a new country, with plans to live there permanently. (Remember- Immigration means to move Into a country) Students are imagining that they are immigrating to an imaginary country.
Immigrant: A person who comes to live permanently in a foreign country.
Ellis Island: An island near New York City. From 1892 to 1954, Ellis Island was used as a station for immigrants coming from other countries to the United States. During this time, over 12 million immigrants came through Ellis Island. (Learn more about Ellis Island with this video below from "A Kid Explains History")
Furthering the Lesson:
1. Books to read with your students to learn more about immigration
Where Are You From? by Yamile Saied Méndez
The Year I Flew Away by Marie Arnold
Other Words From Home by Jasmine Warga
Home is in Between Mitali Perkins
2. Hear the stories of kids who have recently immigrated to the United States at the following website:
http://teacher.scholastic.com/activities/immigration/young_immigrants/
3. Explore Ellis Island at the following website:
Brainstorming Example:
Sample Videos:
Sample Video for Steps 3-11
Sample Photos